If you were raised in the American Southwest or in Mexico, when anyone mentions chiles rellenos, your mouth waters: fresh green chiles filled with melty cheese or meat picadillo and wrapped in a fluffy, golden blanket. In the American Southwest, the chile is usually a version of the long green one made famous in Hatch; in Mexico, it’s mostly poblano. At the Hidalgo market in downtown Veracruz, it’s jalapeños that are stuffed with cheese or pork, fried to a beautiful golden, wrapped in tortillas and eaten as tacos. Feel free to serve these with salsa (Salsa de Molcajete would be delicious), but my favorite is when the market vendors in Veracruz lay down swoosh of simple guacamole, top it with the stuffed chile and then shower everything with some salty aged añejo cheese.
Two notes about technique: Blanching jalapeños in sugar-water to tame some of their heat is common in Mexico, but nowadays may not be as necessary with the mild-bred jalapeños in our markets. And though we've all been told to serve chiles rellenos as soon as they’re fried (which is definitely one great option), I’ve come to think they’re best made several hours ahead and reheated on a parchment-lined baking sheet at 400 degrees for about 8 minutes: They shed most of the oil they were harboring and sort of crisp up in a nice way. It’s always easier for the cook.
INGREDIENTS
- 12 medium-large, fresh jalapeño chiles, stems intact (ones that weigh about 2 ounces are perfect)
- 1 small cone (about 1 ounce) Piloncillo (Mexican unrefined sugar), roughly chopped OR 2 tablespoons dark brown sugar
- Salt
- 12 ounces Mexican melting cheese (Chihuahua, asadero or quesadilla) or Monterey Jack, brick or mild cheddar, shredded (about 3 ½ cups) - don’t use pre-shredded
- 1/2 cup chopped fresh cilantro (divided use)
- 2 soft-ripe avocados, pits removed, flesh scooped from the skins
- 1 green or knob onion, finely sliced crosswise (for the knob onion, finely chop the white bulb)
- A tablespoon or two fresh lime juice
- 5 eggs, separated
- 2 tablespoons flour, plus about ½ cup for dredging
- About 1/2 cup freshly grated Mexican queso añejo or other garnishing cheese such as Romano or Parmesan
- 12 warm corn tortillas
INSTRUCTIONS
Blanch and clean the chiles. Make a T-shaped slit in the side of each chile: the top of the T should be just below and parallel with the top of the chile (and no wider than 1/2 inch), the long part of the should extend from the stem to the point. Fill a medium (4-quart) saucepan with about 3 inches of water, combine the piloncillo (or brown sugar) and 1 teaspoon salt. Bring to a boil, stir until the sugar is dissolved, add the chiles and simmer very gently over medium-low heat, stirring occasionally, until the chiles are almost tender, about 5 minutes. With a slotted spoon, remove the chiles from the liquid, drain cut-side down for a minute or 2, then carefully scrape out the seeds with a small spoon.
Stuff the chiles. Mix together the shredded cheese and about ¾ of the cilantro. Divide the mixture into 12 portions, then compress each into a slender football shape a little smaller than the chiles. Slide a portion of cheese into each chile, then press the sides together to reform the chile’s original shape. I highly recommend that you freeze the chiles for an hour or so to firm them up for easy handling.
Make the Simple Guacamole. In a bowl, combine the avocado, the remaining bit of the cilantro and the onion. Mash to a coarse puree, then season with salt (usually about ¾ teaspoon) and lime juice.
Batter and fry the chiles. Heat the oil over medium to between 360 to 370 degrees. While the oil is heating, spread 1/2 cup of the flour onto a plate. Separate the eggs, letting the whites fall into your electric mixer bowl and collecting the yolks in a small dish. Measure ½ teaspoon salt into the whites, then begin to beat them at medium speed until they hold stiff peaks. With the mixer still going, add the remaining 2 tablespoons of flour, then the yolks, one at a time, letting each be fully incorporated before adding the next.
Working quickly (so that the batter doesn’t deflate) and in groups of 3 or 4 (so the pan doesn’t get crowded), dredge a chile through the plate of flour (it's easiest if you hold it by the stem), shake off the excess flour, then dip the chile into the egg batter to coat it evenly, and lay it in the hot oil. After about 2 minutes, use a spoon to very gently bathe the tops of the chiles with oil. When they're golden underneath, about 1 more minute, use the spoon to turn them over. Fry on the other side (no need to baste them this time), then use a slotted spoon to remove them to a baking sheet lined with several layers of paper towels. If you’re going to serve right away, keep the fried chiles warm in a low oven as they are done.
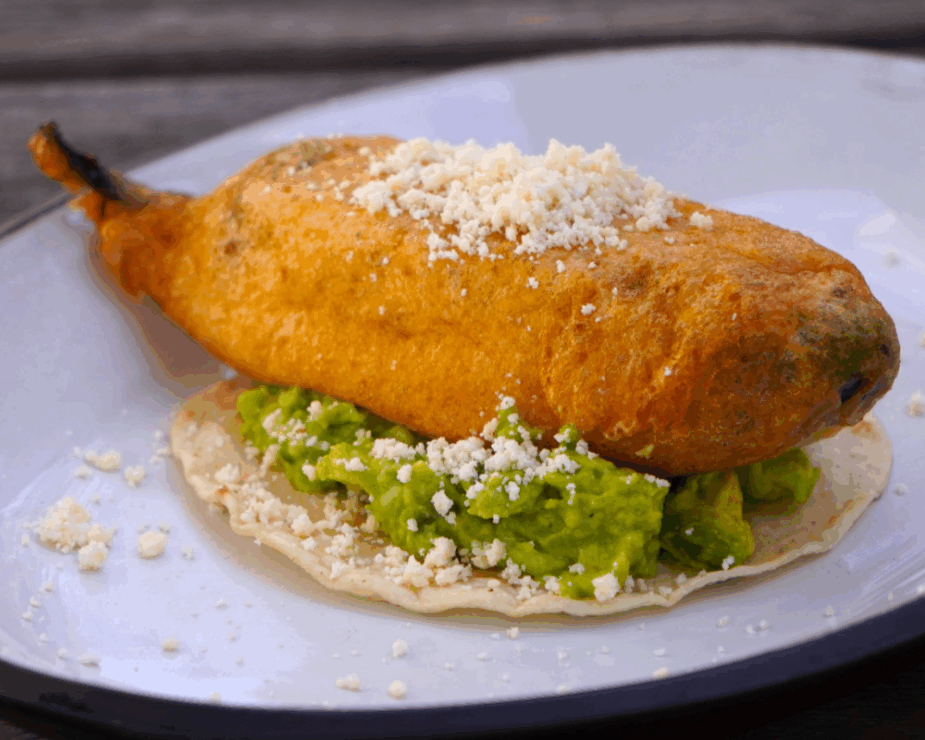
Serve. Make tacos for your guests. Lay down a tortilla, top with a spoonful of guacamole, lay on a chile, then shower with the grated cheese. Serve without hesitation.


