Skip to content
Menu Button
  • Restaurants
    • Column 1
      • Frontera Grill
      • Topolobampo
      • Bar Sótano
    • Column 2
      • Xoco
      • Tortazo
      • Tortas
      • Frontera Cocina
    • Column 3
      • Private Dining
      • Gift Cards
      • Goldbelly Meal Kits
  • Recipes
    • ADVANCED
      SEARCH

      VIEW ALL RECIPESBROWSE CATEGORIESRECIPE COLLECTIONS

    • Column 1
      • Recipe Search
      • View All Recipes
      • Browse Categories
      • Recipe Collections
      • Guacamoles
      • Ceviche, Aguachiles and Other Mariscos
      • Starters, Salads and Snacks
      • Main Dishes
      • Side Dishes
      • Desserts
    • Column 2
      • Tacos and Tostadas
      • Tamales
      • Enchiladas and Chilaquiles
      • Corn Masa Snacks
      • Tortas and Breads
      • Eggs and Other Breakfast Dishes
      • Soups, Pozoles and Chilis
    • Column 3
      • Margaritas, Cocktails and Other Beverages
      • Essential Preparations
      • Salsas, Hot Sauces and Condiments
      • Moles and Pipianes
      • Mexican Ingredients
  • SHOWS
    • Column 1
      • Watch Season 12:
        BAYLESS’ BEST EVER
      • TV Show Recipes
      • MOPAAT Seasons
      • Mexico One Plate at a Time
    • Column 2
      • Top Chef Masters Information
      • Stream Top Chef Masters episodes on Prime
      • Top Chef Masters
    • Column 3
      • Cooking Tutorials
      • Rick Bayless Taco Manual
      • Stream MOPAAT Episodes
      • YouTube
  • Shop
    • Column 1
      • Chef Rick Bayless
        Online Shop
    • Column 2
      • Cooking Classes
      • Goldbelly Meal Kits
    • Column 3
      • Restaurant Gift Cards
  • About
    • Column 1
      • Meet Rick Bayless
      • Rick Bayless Timeline
      • Awards and Affiliations
      • The Bayless Gardens
      • Rick’s Travel Guides
      • About Rick Bayless
    • Column 2
      • Frontera News
      • Frontera Farmer Foundation
      • Impact Culinary Training
      • Bayless Family Foundation
      • Frontera Farmer Foundation
    • Column 3
      • Follow Rick on Social
      • Instagram
      • Twitter
      • Facebook
      • Pinterest
      • Vimeo
      • Rick Bayless YouTube
  • Instagram
  • Twitter
  • Facebook
  • Pinterest
  • Vimeo
  • YouTube
« BACK TO ALL RECIPES
recipes / Candies / cocadas horneadas

Cocadas Horneadas

Cocadas Horneadas
Servings: 16 2-inch candies
  • Facebook
  • Pinterest
  • Twitter
  • Print
Recipe from Season 5, Mexico—One Plate at a Time

INGREDIENTS

  • 1 medium (1 1/4 pound fresh coconut, with plenty of water inside OROR 12 ounces coarsely shredded frozen coconut meat OR 10 ounces dried unsweetened coconut flakes
  • 1 1/4 cups (9 ounces) sugar
  • 1 tablespoon corn syrup
  • 1 inch piece of Mexican cinnamon stick preferably Mexican canela
  • 2 tablespoons milk
  • 3 large eggs yolks

INSTRUCTIONS

  1.  The fresh coconut. Turn on the oven to 325 degrees. Twist a corkscrew (or drive an ice pick) into 2 of the - eyes- of the coconut (the dark indentations on one end), then drain the trapped liquid into a cup (strain if it contains any bits of coconut shell). Place the coconut in a preheated 325 degrees oven for 15 minutes to help loosen the flesh from the shell. With a hammer, crack the coconut into several pieces, then use a small knife or screwdriver to pry the flesh from the shell. Use a small knife or a vegetable peeler to peel away the dark skin from the coconut flesh. In a food processor (or, with determination and stamina, using a four-sided grater) grate the coconut into medium-fine shreds. If you are using frozen or dried coconut, measure it out.
  2.  Cooking the coconut. Combine the sugar (if using dried coconut, use only 1/2 cup sugar), corn syrup and cinnamon stick in a medium, heavy saucepan. Add enough tap water to the coconut water to bring the volume to 1 cup, stir into the sugar mixture, bring to a boil and wash down the sides of the pan with a brush dipped in water.Add the coconut and cook for 15 to 20 minutes over medium to medium-low heat, stirring frequently, just until all the liquid has been absorbed or evaporated (do not let it brown). Remove from the heat and pick out the cinnamon stick.Mix together the milk and egg yolks, stir in a few spoonfuls of the hot coconut, then stir the yolk mixture into the pan. Set over medium-low and cook, stirring constantly, until the yolk mixture has thickened and been absorbed, about 5 minutes. (The liquid will come to a simmer: if heated gently, it will NOT curdle, though it is boiling gently.)Remove from the heat, spread out on a tray or baking dish and cool to room temperature.
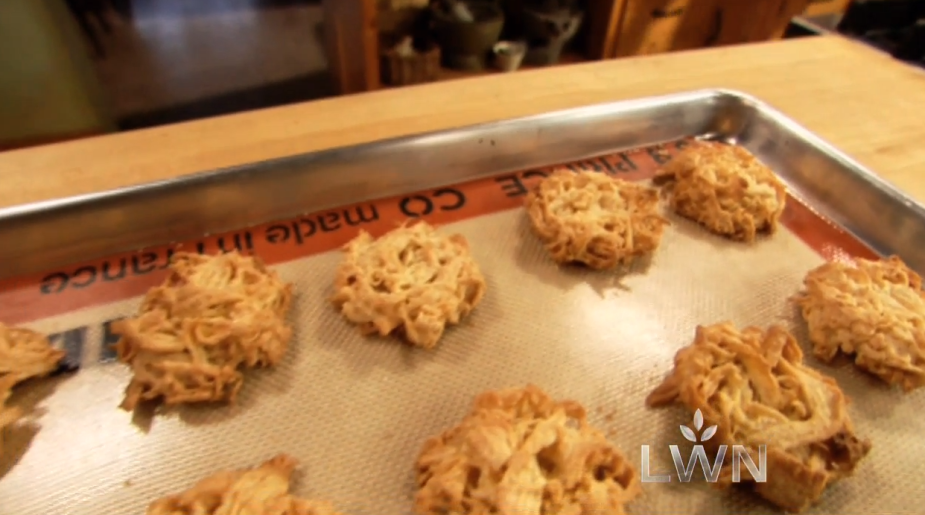
  3.  Baking the coconut candies. Preheat the oven to 325 degrees and line a large baking sheet with parchment paper (or heavily grease and flour it). Scoop up about 2 tablespoons of the cooled coconut mixture, form into a 2-inch cake (about 1/2-inch thick) and lay on the baking sheet; form the remaining coconut mixture into patties in the same manner.Bake for 20 to 25 minutes, until thoroughly browned. Let cool on the baking sheet, then remove, freeing any that stick by sliding a knife underneath and twisting the blade to pop them free. Let stand upside down for an hour or so, for the bottoms to firm and harden, then store in an airtight container.
Candies, Yucatán, Season 5 Recipes: The Yucatan!, Cinco de Mayo, Dias de los Muertos, New Year's Eve, Perfect for a Party

Post navigation

Fire-Roasted Rotisserie Chicken
Rennet-Set Fresh Cheese

RELATED RECIPES

Candies

Classic Chocolate Truffles

Other Desserts

Plantain, Pineapple and Sweet Potato, Camotero style

Other Desserts

Marquesitas

Other Desserts

Easy Vanilla Flan

Non-Alcoholic Beverages

Apple-Tamarind Agua Fresca

COPYRIGHT © RICK BAYLESS. ALL RIGHTS RESERVED.
  • Restaurants
  • Recipes
  • Shows
  • Shop
  • About
  • Instagram
  • Facebook
  • Twitter
  • Pinterest
  • YouTube
  • Vimeo
  • Contact Us

Rick Bayless is the chef and owner of an award-winning world of restaurants including Frontera Grill and Topolobampo in Chicago. He is also a teacher, author, philanthropist, YouTube creator and much more. Explore our “About” section to learn more!