INGREDIENTS
- 1 gallon best-quality whole or 2% milk
- 2 cups best-quality buttermilk (do your best to determine that it contains live cultures)
- 1/2 cup fresh lime juice OR 1 teaspoon citric acid (aka sour salt, available in the Kosher section of well-stocked grocery stores)
- 1 teaspoon salt (fine-ground sea salt works best here)
INSTRUCTIONS
Optional milk culturing. For the most developed flavor culture the milk before you set the curd. Pour the milk into a large (at least 8-quart) pot like an enameled cast-iron Dutch oven or stainless-steel stock pot. Warm the milk to 80 or 90 degrees—no warmer than body temperature. Stir in the buttermilk, cover and let stand at warm room temperature for 3 or 4 hours for the active cultures in the buttermilk to multiply and give the milk an even richer, more complex flavor.
Set the curd. If you didn’t culture the milk, pour the milk and buttermilk into a large (at least 8-quart) pot like an enameled cast-iron Dutch oven or stainless-steel stock pot. For the cultured or freshly combined mixture, set over medium heat and bring to 190 degrees, stirring occasionally to ensure that it isn’t scorching on the bottom. If using citric acid, mix it with ¼ cup water, stirring to dissolve. When the milk reaches 190, turn off the heat and stir in the lime juice or dissolved citric acid, continuing to stir slowly to ensure that it is thoroughly incorporated. You’ll notice the milk curdling right away, small, firm curds separately from the milky-watery whey. Let stand for about 10 minutes for the curd to firm.
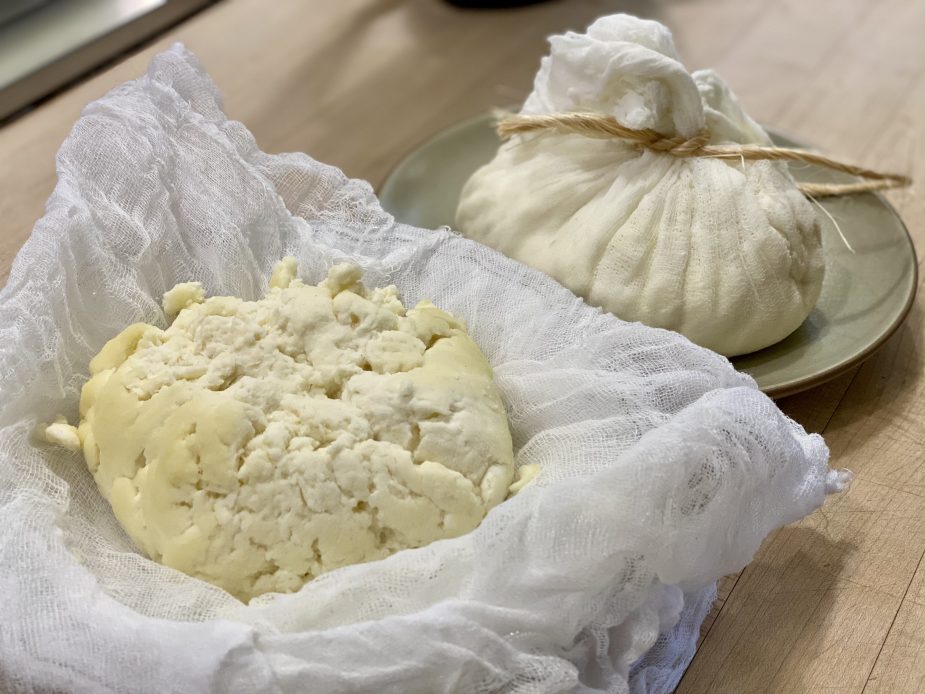
Drain the curd. While the curd is firming, dampen enough cheesecloth or a thin tea towel to line a colander (if the cheesecloth is very gauzy use two layers). Using a skimmer or a slotted spoon, gently spoon the curds into the cloth-lined colander. Let drain for a few minutes, then gather up the cheesecloth or towel and gently press out more whey. Open up your package and break apart the curds. Sprinkle evenly with salt and work it in thoroughly, then either gather the cheesecloth, forming the curds into a ball, or use your hands to form the curds into a disk that’s about 1-inch thick. Set in a bowl or deep plate (it will continue to leak whey), cover with plastic wrap and refrigerate until cold, about an hour.
Well wrapped, your queso fresco will last for a week or so in the refrigerator.